Panda 141 modification manual · Engine conversion
Punto 75 8V MPI into Panda 141 4x4
This guide covers a Fiat Punto MK1 1.2 MPI “75” engine, complete ECU, injection system, coil packs, relays, and engine-bay harness installed into a Panda 141 4x4 chassis of any petrol engine variant.
Verify every wire colour, connector, part, and measurement against your own donor and Panda before cutting or modifying anything. Italians loved to switch up the colors of the wires, and the mechanical components varied wildly depending on when the car was produced. Engine conversions may affect registration, insurance, emissions, braking requirements, and road legality.
General information
Scope and donor specification
Although the Panda will fit any FIRE engine that FIAT was putting in a wide range of cars of that era in terms of engine mounts and gearbox, this swap is one that makes the most sense for the 4x4 variant in my opinion. The Punto 75 8V MPI engine is the swap requiring the least modifications, produces 19HP more than the most powerful Panda variant (1.1 liter) and unlike the 16V engine it will give torque on lower RPMs which fits the 4x4's intended purpose. Keeping the complete original injection system makes the electrical work much easier because the engine and the harness are one self-contained unit that just needs to get power from the car and connect some warning lights for your comfort.
There was no carburettor 1.2 FIRE engine in the Punto. Fiat phased carburettors out of the FIRE family before the Punto launched, so every Punto MK1 1242 cc engine is injected, but some engines used a single injector and some an injector per cylinder.
75 MPI versus 60 SPI
There was also a version of the engine in the Punto 60 of the same displacement that used SPI variant and produced singificantly less horse-power. Since old Punto's are abundant pretty much everywhere in europe it makes litle sense to opt for that variant, but I believe this guide should be applicable to that engine as well. The Punto 75 uses multi-point injection: four injectors mounted in a fuel rail, one for each inlet port. The lower-output Punto 60 uses a single throttle-body injector and different ECU.
All MK1 1.2 engines are distributorless wasted-spark systems. The Punto 75 has two coils mounted side-by-side at the gearbox end of the cam cover, with four HT leads running to the spark plugs.
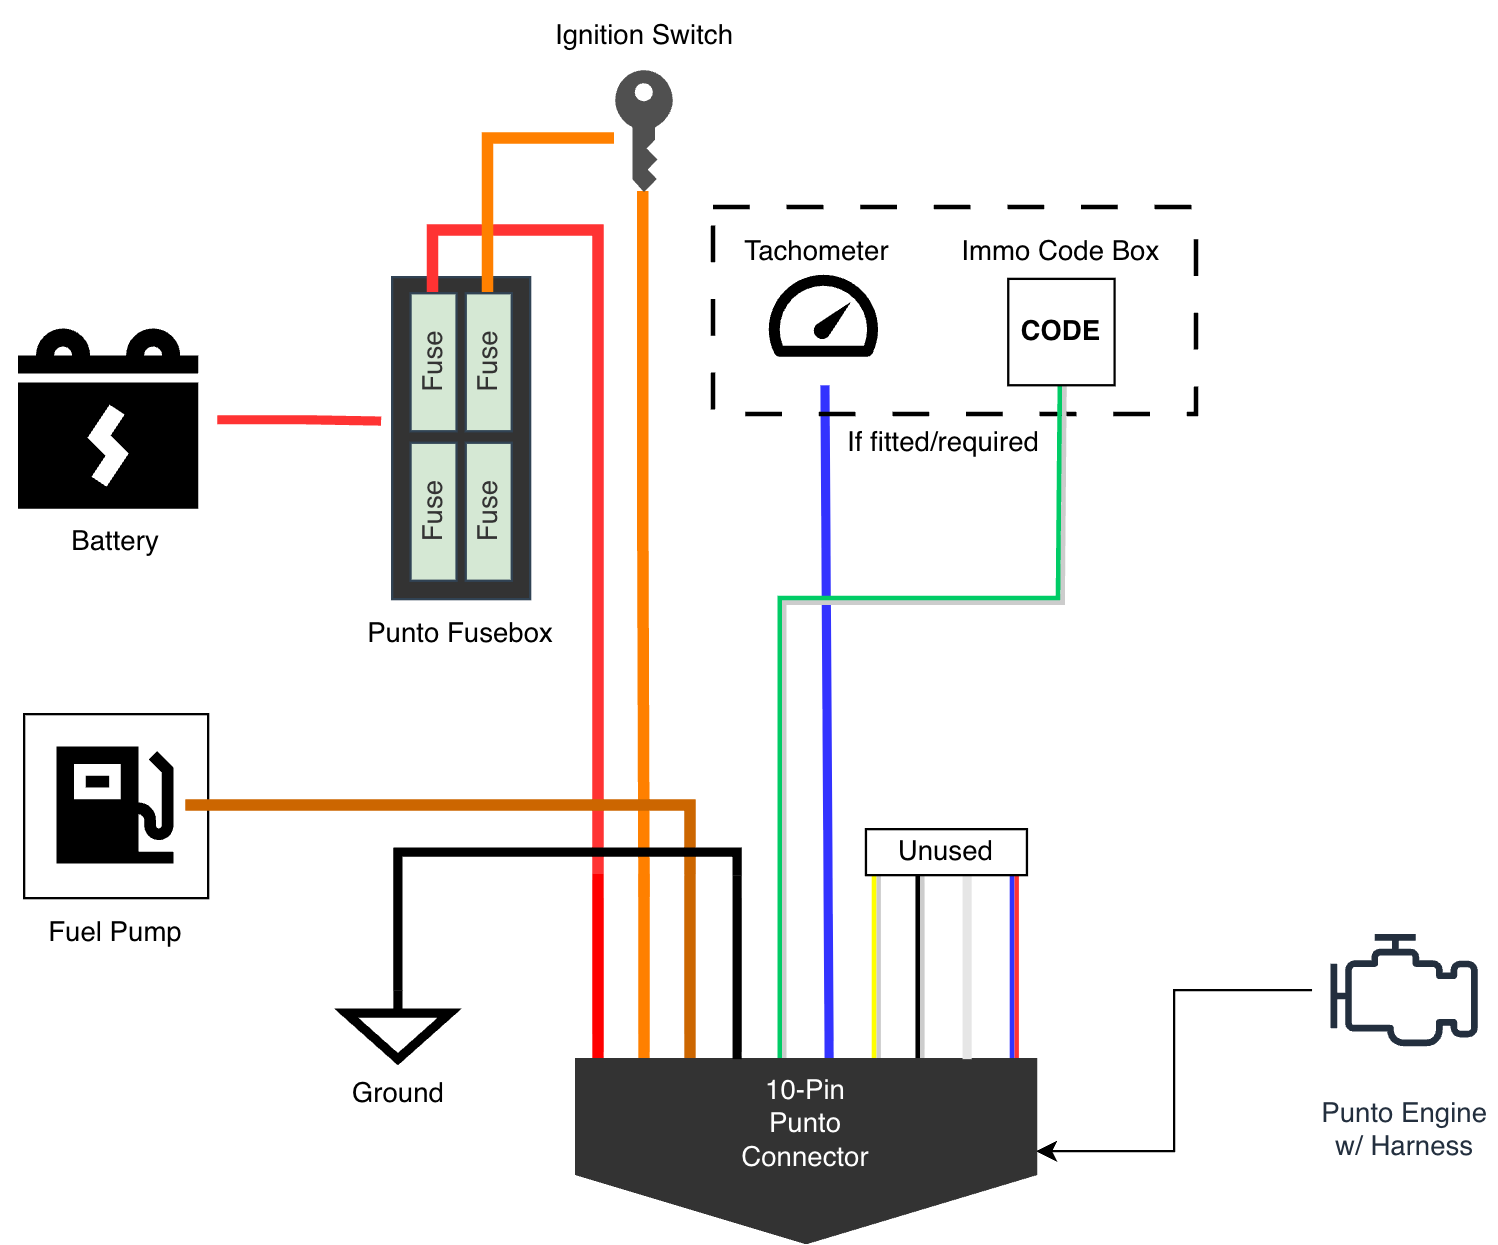
Transplant the Punto engine-management system as a complete module. Leave the engine loom connected to the injectors, coils, lambda sensor, crank sensor, and ECU coolant sensor. Bridge only the small number of circuits needed to connect it to the Panda.
Donor identification
Confirming the 75 MPI
- Check the fuel rail
The MPI 75 has a horizontal aluminium rail feeding four separate injectors with the fuel line coming from the right side of the engine.
- Read the block stamp
Locate the machined pad at the timing-belt end of the block, immediately below the cylinder-head joint. The Punto 75 MPI engine code is 176A8.000.
- Read the ECU label
The Punto 75 normally uses a Magneti Marelli IAW 8F.5T. Labels may include part numbers such as 46439052 and longer type strings such as IAW 8F.5T/070C-18. An ECOL suffix normally identifies an ECU with the immobiliser deleted.
| Variant | Typical engine codes | Injection |
|---|---|---|
| Punto 75 | 176A8.000 | Multi-point injection |
| Punto 60 | 176A7 / 176B1 / 176B4 | Single-point injection |
| Punto 1.2 16V | 176B9 | Multi-point injection |
| Punto 1.1 | 176A6 / 176B2 | Single-point injection |
Donor vehicle
Acquiring the Donor
Punto's were very popular cheap cars in many european countries, the Mk1 model was produced in 3.5M units over it's production lifetime and even overtook the Volkswagen Golf as the best-selling car in europe for a while. The 75 variant was one of the more expensive models so it is not as common as the 55 and 60 variants which were more easily available. That being said, the 75 can still be available for very little money as the car is looked as a beater and never really took off in the enthusiast circles.
The donors interior and health doesn't really matter, but obviously the better the car looks - the bigger the chance that the owner took care of it and serviced it properly. You should only be concerned if the engine is firing properly and works well on all revs to minimise cost and effort to get it to a nice working state. Either way you will be pulling it out of the car so there is absolutely no reason to not do a full service of all engine components while it is on the bench and easily accessible.
Donor vehicle
Stripping the Donor
We are only interested in certain components of the donor vehicle which I will list below. After you strip them out you can safely send the rest of the chassis to a recycling yard or sell if any of the parts are in a good condition. (The seats from the Punto make for a lovely garage chair set!)
Components we need from the Punto:
| Component | Location | Notes |
|---|---|---|
| Engine Airbox & Filter | Engine Bay | Part of the engine assembly, but you will likely remove it first when removing the engine, so don't forget to keep it as well! |
| Engine & Harness | Engine Bay | The whole engine, including the alternator, starter motor and the full wiring harness needs to come out. It should be connected to the car itself by the 10-pin connector which you can disconnect. |
| 10-pin Square Harness Connector | Engine Bay | The engine harness will have a square 10-pin connector that plugs into the same connector attached to the harness of the car. Cut off the connector wired to the harness of the car, leaving at least 10-20cm of wiring to solder to the Panda later. |
| Engine Bay Fusebox | Engine Bay | There is a 4 fuse fusebox in the engine bay with an additional cooler vent fuse on a separate wire. Cut it out with as much wiring as you can to give you the most options of configuring your engine bay later. |
| ECU & Holder Bracket | Engine Bay (left side) | We will be installing the ECU in the Panda, you can take the metal bracket it is installed on to modify it and use to clean up your engine space later. |
| Immobiliser Code Box & Antenna | Below steering wheel & on the ignition barrel | The immobiliser code box has 2 connectors on the bottom, one leading to the antenna slotted on the ignition barrel, and other to the harness of the car leading to the ECU. Remove the code box, take the antenna off the ignition barrel and you can cut off the other connector from the car and keep just in case depending on how you want to handle the immobiliser later. |
| Blue Key | Your Hand? | The blue key has a immobiliser chip married to the codebox and the ECU, very important you don't throw it away! We don't need the barrel lock, just the chip embedded in the key. |
| Fuel Pump | Petrol Tank | You will likely need to install a different pump into your panda, since they are easily available new I couldn't be bothered to take it off. You can just buy a new one which is safer to do anyway as this might fail eventually anyway. If on a budget, you can re-use it though. |
Engine preparation
Prepping the Engine
While you pulled the engine out on your bench, now is the ideal to replace and service the engine fully. You don't want to install it just to have a failure of a 10 EUR part that requires you to pull the engine again to replace it. Replace the timing belt, the spark plugs, clutch, thermostat, gaskets, seals, even get the head of the engine machined - do everything now when you have a chance to do it easily and cheaply!
When disassembling the engine make sure you label the connectors where they need to go so you don't forget how to re-attach the harness later.
Engine installation
Replacing the Engine
You need to drop the existing engine out of the Panda including it's harness (relays, engine bay fuses). Essentially everything that is attached to the engine needs to go out, the only thing we will need is the gearbox so get it out and attach to the Punto engine. You should be able to drop in the Punto engine pretty much straight in on the same engine mounts as all FIRE engines should fit.
There is a metal holder on the Panda engine that is a bit different from the one on the Punto engine which you will need to replace. Also the throttle pulley holder that attaches onto the throttle body didn't fit from the Panda for us, so we cut half of Punto one (where it attaches to the throttle body), and half from the Panda one and welded them together to get the correct length where the throttle can be operated in its full operating range.
Mechanical installation
Mechanical fitment
| Area | Recommended approach |
|---|---|
| Engine mounts | The engine installs on the original Panda mounting points, might need to get a bracket of the Panda engine and install it on the Punto engine. |
| Throttle cable mount | You need to make sure the throttle can operate in full range of motion, you might need to weld together the Panda & Punto throttle cable holders to make it fit well. |
| Gearbox | Retain the Panda 4x4 gearbox. FIRE gearboxes share the basic engine interface; the Punto gearbox ratios are not intended for the Panda 4x4 transfer case. |
| Clutch | Retain the donor flywheel so the crank-sensor trigger remains correct. Community practice is to combine the Punto clutch disc with the Panda 4x4 pressure plate and release bearing. |
| Exhaust | The 1242 block is slightly taller than the 999/1108. Add a short spacer or fabricated section to the downpipe and fit a lambda-sensor boss after the collector. |
| ECU mounting | The inner wing is the usual mounting position where the Punto loom naturally reaches. Some installations require moving or removing the washer bottle. It's up to you how you want to organise your engine bay, you can re-use the ECU mount from the Punto and cut it/weld it to your needs. |
Electrical system
Engine-management wiring
The Punto loom should remain connected to the coil pack, injectors, lambda sensor, crank/TDC sensor, and two-wire ECU coolant sensor. The ignition drivers are inside the IAW 8F.5T ECU; there is no separate ignition module.
The moulded white twin-relay box contains the main injection relay and fuel-pump relay. The ECU pulls in and latches the main relay, which supplies the coils and injectors.
Where both cars have the same basic sender function, retain the Panda wiring for the oil-pressure switch, coolant gauge sender, and alternator warning lamp. This can be wired through the square 10-pin connector as well, but that means pulling wires out of the Panda harness and is more destructive. Adapt the connector at the component where necessary.
First confirm that the main relay is powered and latched. A missing ignition-live feed commonly leaves both coils and injectors dead.
You are likely missing a ground wire on the 10-pin connector or near the ECU assembly.
| Punto wire | Function | Panda connection |
|---|---|---|
| Thick red | Constant battery +12 V | Fused battery positive |
| Orange | Ignition live, key in run/MAR | Switched ignition live |
| Brown / white | Fuel-pump feed | Through relay and inertia switch to pump |
| Black | Ground / earth | Clean bonded point on engine head |
| Light grey / green | CODE box, ECU pin 7 | Retain when using matched immobiliser parts |
| Blue | Engine-speed signal | Panda tachometer, if fitted |
| Grey/yellow, grey/black, grey | Oil light, charge light, temperature gauge | Normally retain the Panda loom instead, but you can use these instead if you wish |
The single-wire sender at the rear of the head drives the Panda dashboard gauge. The two-wire NTC sensor in the thermostat housing feeds the ECU and must remain connected to the Punto loom. Mixing them up can leave the gauge dead and put the ECU into limp-home operation.
Fuel system
Fuel-pump installation
The MPI camshaft has no mechanical-pump lobe. An electric injection pump is required and must deliver the pressure needed by the MPI rail. A standard inline 3–5 bar pump is commonly used; the rail-mounted regulator controls working pressure and returns surplus fuel to the tank via the return line. The solution to this is to put a different diameter fuel lines, or more easily put a fuel-pump that has a higher working pressure than the stock panda fuel-pump.
You can use the one off the Punto, but they are quite cheap so better just buy a new one for the Punto and install that into the Panda fuel tank. You will need to get the Panda on the lift, take off the fuel tank completely (remembering to mark the lines so you know how to re-attach correctly later) and replace the pump before re-installing.
An oversized pump working against the narrow original return line can create excessive back-pressure. Some people using this conversion reported enough pressure to blow the return pipe from the top of the tank.
The brown wire is the switched output from the fuel-pump relay. Retain the inertia switch where fitted. At key-on the ECU primes the pump briefly, then switches it off until a crank signal is detected. This pause is normal and provides a safety cut-off. The wire going to the fuel-pump is usually located in the top left corner of the engine-bay, left of the battery with a single brown wire running to a connector.
Return to contentsFuel system
EVAP System
Both Panda and Punto are fitted with EVAP systems, but they are implemented differently. The throttle body has a pipe fitment that will be connected to the charcoal canister via a EVAP solenoid operated by the ECU. You will need to use the EVAP solenoid that was set up on the Punto, but you will need to connect it to the charcoal canister on the Panda which is hidden behind the front-left tyre wall.
Pipe fitment on the throttle body MUST be closed via a EVAP solenoid piped return to the charcoal canister, or at least with some sort of a air-tight cap. Not closing it can have the engine pull air even when the throttle body is closed!
Alternatively you can close the fitment on the throttle body with some sort of a air-tight cap, but then the canister that collects the petrol fumes will be leaking it into the engine bay. The redneck way of correcting this would be to point the piping from that outside of the engine bay space which will still leak the fumes into the surrounding area, but prevent pressure build up in the tank. This is obviously less than ideal because petrol fumes are flammable, smell, accumulate in the area where the car is parked and not having the EVAP system connected will cause the ECU to not work well and throw an engine light.
Do NOT close the EVAP line coming to or out of the charcoal canister, this can lead to the fumes accumulating in the fuel tank busting a line or exploding in a hollywood manner.
Ancillary systems
MPI-specific systems
Coolant-heated throttle body
The Punto 75 throttle body is warmed by two small coolant pipes connected to the heater-matrix circuit. Connect these pipes for correct cold-weather driveability and a tidy factory-style installation. Since the Panda cooling system does not plan for these pipes you will need to find a way to correctly plumb it into the system.
Fiat CODE immobiliser
When retaining the matched ECU, CODE box, aerial ring, and key, fit the aerial ring around the Panda ignition barrel and leave the light grey/green ECU pin-7 wire connected to the CODE box. If your Panda already has an immobiliser you will find a place to put your code box below the steering wheel, but since the ECU in the Panda is inside of the car, you will need to find a way to get the code wire back to the engine bay 10-pin connector. Leaving it inside will make for a cleaner installation, and wire the dashboard immobiliser light.
If you decide to use the immobiliser you will need to re-code your Panda ignition key with the immo code from the Punto key for the engine to start. Any good locksmith should be able to do re-code your key if you have your original Punto blue key.
The immobiliser prevents the ECU from firing the ignition coils. If you don't have a spark make sure the immobiliser system is correctly set up or defeated as this is a common cause for the engine not starting.
Alternatively you can mod your ECU and do a "IMMO delete" which basically disables the immobiliser feature of the ECU permanently and makes this much simpler provided you can find a person that wants to mod such an old ECU that does not allow modding through the OBD port.
Redneck alternative is to wire the code box, the antenna and tape the key to the antenna in the engine bay which will work - however you risk getting this contraption to fall apart when driving - leaving you stranded so I would not recommend it.
Source notes & Thank you's
Initial guide compiled from Fiat Forum Panda Classic swap discussions, panda4x4.info engine-swap material, and IAW 8F.5T pinout discussions. Treat community wire colours and fitment advice as a starting point and verify them against the actual components.